HOW-TO Configure Citrix VDA for Linux with MCS and FAS

A comprehensive guide on how to install Citrix VDA for Linux with MCS and FAS.
- Why this article?
- Supported Linux distributions for MCS and FAS
- Prerequisites
- Components in use
- Installation and configuration
Why this article?
As a very non-Linux kind-a-guy. I haven’t been able to find an article, which helps with installing a Citrix VDA for Linux and enables MCS and FAS.
This has been a trial’n’error installation, since Linux VDAs in tiny Denmark is very uncommon. So please take in to consideration, that the article is not bullitproof and you may need to do several configurations.
Supported Linux distributions for MCS and FAS
It can be a little tricky, finding the correct distribution and versions of that distribution, which is supported for both MCS and FAS.
As per written, the supported versions are as follows:
MCS supported distributions:
| Distributions Version | Winbind | SSSD | Centrify | PBIS |
|---|---|---|---|---|
| Debian 11.3 | Yes | Yes | No | Yes |
| RHEL 9.1/9.0 | Yes | No | No | No |
| RHEL 8.7/8.6/8.4 | Yes | No | Yes | Yes |
| Rocky Linux 9.1/9.0 | Yes | No | No | No |
| Rocky Linux 8.7/8.6 | Yes | No | No | No |
| RHEL 7.9, CentOS 7.9 | Yes | Yes | Yes | Yes |
| SUSE 15.4 | Yes | Yes | No | Yes |
| Ubuntu 22.04, Ubuntu 20.04, Ubuntu 18.04 | Yes | Yes | No | Yes |
FAS enabled on MCS supported distributions:
| Distributions Version | Winbind | SSSD | Centrify | PBIS |
|---|---|---|---|---|
| Debian 11.3 | Yes | No | No | No |
| RHEL 9.1/9.0 | Yes | No | No | No |
| RHEL 8.7/8.6/8.4 | Yes | No | No | Yes |
| Rocky Linux 9.1/9.0 | Yes | No | No | No |
| Rocky Linux 8.7/8.6 | Yes | No | No | No |
| RHEL 7.9, CentOS 7.9 | Yes | Yes | No | Yes |
| SUSE 15.4 | Yes | No | No | No |
| Ubuntu 22.04, Ubuntu 20.04, Ubuntu 18.04 | Yes | No | No | No |
As you can see, it’s very limited, which authentication method, that can be used, when both MCS and FAS is to be used.
Prerequisites
- Internet!.. For the love of god.. internet..
Otherwise you will need to setup a repo containing every dependency needed for each installation. Aka new VDA version, new repo, new dependencies. - Download Citrix VDA for Linux rpm package
https://www.citrix.com/downloads/citrix-virtual-apps-and-desktops/components/linux-vda-2303.html - Internal PKI for Citrix FAS
Components in use
- RHEL 8.4 Workstation VM on VMWare ESXi 6.7
- XenDesktop VDA 2204 Agent
Installation and configuration
Installation
Power on the template VM, and make sure the time is correct.
If not, set checkmark in “Synchronize guest time with host”
.NET Runtime 6.0 needs to be installed before anything, for Virtual Desktop Agent to function.
Start Terminal and run the following:
sudo rpm -UvH https://packages.microsoft.com/config/rhel/8/packages-microsoft-prod.rpm
sudo yum install aspnetcore-runtime-6.0
Find .NET Runtime 6.0 for your distribution here: https://packages.microsoft.com/config
e.g. RHEL 8.x is https://packages.microsoft.com/config/rhel/8/packages-microsoft-prod.rpm
When installing VDA for Linux on RHEL, install EPEL repository before the VDA.
Read more about EPEL here: https://docs.fedoraproject.org/en-US/epel/
rpm -qa | grep epel, shows the installed version of EPEL.
yum search epel-release
yum install epel-release
yum update
rpm -qa | grep epel
Copy the downloaded VDA install package to a folder on the template VM, e.g. /tmp and type the following in Terminal.
Use WinSCP to transfer files between a Windows box and a Linux box. Much easier.
Install Citrix VDA for Linux.
Remember to edit the installer, to the correct filename.
sudo yum -y localinstall /tmp/XenDesktopVDA-xx.xx.x.xx-x.xxx_x.x86_64.rpm

MCS Configuration
For MCS to work, we need to edit sudo /etc/xdl/mcs/mcs.conf
This is a complete mcs.conf with the needed settings for MCS and FAS.
Please edit so it fits your configuration.
#!/bin/bash

###############################################################################
#
# Citrix Virtual Apps & Desktops For Linux Script: Machine Creation Service
# Copyright (c) Citrix Systems, Inc. All Rights Reserved.
#
# This is the configuration file for mcs scripts.


#########################Template machine check################################
# If unspecified, the value is N by default, meaning that mcs configuration templates will overwrite configuration items
# If you choose Y, MCS created VMs will use the existing configurations of the current VDA that must running correctly
Use_Existing_Configurations_Of_Current_VDA=

#########################DNS Configuration#####################################
# Provide DNS information
# You can provide 4 DNS servers at most.
# Leave empty if you do not have 4 servers. You may also leave all of them empty
# and configure dns manually.
# Format:
# dns1="xx.xx.xx.xx"
# dns2="xx.xx.xx.xx"
# dns3=
# dns4=
dns1=Insert DC IP here
dns2=Insert DC IP here
dns3=
dns4=

#########################NTP Configuration#####################################
# Provide NTP server information.
# If not set here, the default value will be the address of domain controller.
# Format:
# NTP_SERVER="xx.xx.xx.xx"
NTP_SERVER=1=Insert NTP server IP here

#########################WORKGROUP Configuration###############################
# Provide Workgroup information.
# Usually workgroup is the same with domain name and you do not need to configure it here.
# If that is not the case, please config it according to the correct format:
# WORKGROUP="workgroup_name"
WORKGROUP=

#########################Domain Join Configuration#############################
# Provide Domain Join method.
# Winbind: support RHEL7/CentOS7, RHEL8/CentOS8, SUSE12, SUSE15, Ubuntu16.04, Ubuntu18.04, Ubuntu20.04
# SSSD: support RHEL7/CentOS7, Ubuntu16.04, Ubuntu18.04, Ubuntu20.04, SUSE12, SUSE15
# Centrify: support RHEL7/CentOS7
# PBIS: support RHEL7/CentOS7, RHEL8/CentOS8, SUSE12, SUSE15, Ubuntu16.04, Ubuntu18.04, Ubuntu20.04, Debian 10
# AD_INTEGRATION="winbind" or AD_INTEGRATION="sssd" or AD_INTEGRATION="centrify" or AD_INTEGRATION="pbis"
AD_INTEGRATION="winbind"

#########################Centrify download path Configuration#############################
# When choose Centrify as AD_INTEGRATION, provide Centrify download path with related distribution if Centrify is not installed.
# To find out the correct download url for your os, you may go here:
# https://www.centrify.com/express/linux/download-files/#accordion-download-express-02
CENTRIFY_DOWNLOAD_PATH=


#########################Centrify Samba download path Configuration#############################
# When choose Centrify as AD_INTEGRATION, provide Centrify Samba download path with related distribution if Centrify is not installed.
# CENTRIFY_SAMBA_DOWNLOAD_PATH=https://downloads.centrify.com/products/adbindproxy/2020/centrify-adbindproxy-5.7.0-rhel5-x86_64.tgz
CENTRIFY_SAMBA_DOWNLOAD_PATH=


#########################PBIS download path Configuration#############################
# When choose PBIS as AD_INTEGRATION, provide PBIS download path if PBIS is not installed.
# PBIS: support RHEL7/CentOS7, RHEL8/CentOS8, SUSE12/SUSE15, Ubuntu16.04, Ubuntu18.04, Ubuntu20.04
# RHEL7 and SUSE12: https://github.com/BeyondTrust/pbis-open/releases/download/8.8.0/pbis-open-8.8.0.506.linux.x86_64.rpm.sh
# RHEL8: https://github.com/BeyondTrust/pbis-open/releases/download/9.1.0/pbis-open-9.1.0.551.linux.x86_64.rpm.sh
# Ubuntu: https://github.com/BeyondTrust/pbis-open/releases/download/8.8.0/pbis-open-8.8.0.506.linux.x86_64.deb.sh
# SUSE15: https://github.com/BeyondTrust/pbis-open/releases/download/9.1.0/pbis-open-9.1.0.551.linux.x86_64.rpm.sh
# PBIS_DOWNLOAD_PATH=https://github.com/BeyondTrust/pbis-open/releases/download/8.8.0/pbis-open-8.8.0.506.linux.x86_64.rpm.sh
PBIS_DOWNLOAD_PATH=


#########################Machine Password Automate Update############################
# Machine password will expire after 30 days(default), so we have a mechanism to update
# this password regularly.
# You can set this value to enabled to enable this feature.
UPDATE_MACHINE_PW="Y"

#########################Linux VDA Configuration###############################
# Provide Linux VDA configuration information.
# Please refer to Linux VDA Documentation for these settings.
DOTNET_RUNTIME_PATH=/usr/bin
DESKTOP_ENVIRONMENT=gnome
SUPPORT_DDC_AS_CNAME=N
VDA_PORT=80
REGISTER_SERVICE=Y
ADD_FIREWALL_RULES=Y
HDX_3D_PRO=N
VDI_MODE=N
SITE_NAME='<none>'
LDAP_LIST='domaincontroller01.domain.local;domaincontroller02.domain.local' <--- edit
SEARCH_BASE='DC=domain,DC=local' <--- edit
FAS_LIST='citrixfederationserverNAME01.domain.local;citrixfederationserverNAME02.domain.local' <--- edit
START_SERVICE=Y
TELEMETRY_SOCKET_PORT=7503
TELEMETRY_PORT=7502
All of this can also be configured using Easy Install, but I haven’t tried it.
It’s available here: /opt/Citrix/VDA/bin/easyinstall
EDIT 12/09-2023: This cannot be used for MCS, only standalone VDAs
Run sudo /opt/Citrix/VDA/sbin/deploymcs.sh from Terminal

I’m deviating from Citrix Docs at this point. Because they want to edit /etc/krb5.conf at this point, but an one and a half year Citrix Support ticket says otherwise.
I’ll move straight for the FAS configuration and will get back to /etc/krb5.conf later in the configuration.
FAS Configuration
If you are using both root and intermediate certificate in your environment, copy both of them to /tmp
They need to be DER encrypted
sudo openssl x509 -inform der -in /tmp/root.cer -out /etc/pki/CA/certs/root.pem
sudo openssl x509 -inform der -in /tmp/intermediate.cer -out /etc/pki/CA/certs/intermediate.pem
Install of pam_krb5 module:
Download the module and copy .rpm file to /tmp
https://centos.pkgs.org/7/centos-x86_64/pam_krb5-2.4.8-6.el7.x86_64.rpm.html
Yes, it reads CentOS, but it works for RHEL and is the module Citrix links to aswell.
Direct download path.
http://vault.centos.org/7.9.2009/os/Source/SPackages/pam_krb5-2.4.8-6.el7.src.rpm
yum install make gcc krb5-devel pam-devel autoconf libtool
rpm2cpio pam_krb5-2.4.8-6.el7.src.rpm | cpio --extract --make-directories
tar xvzf pam_krb5-2.4.8.tar.gz
cd pam_krb5-2.4.8
./configure --prefix=/usr
make
make install
ls -l /usr/lib64/security | grep pam_krb5
Run sudo /opt/Citrix/VDA/sbin/ctxfascfg.sh
Choose 1 for Winbind 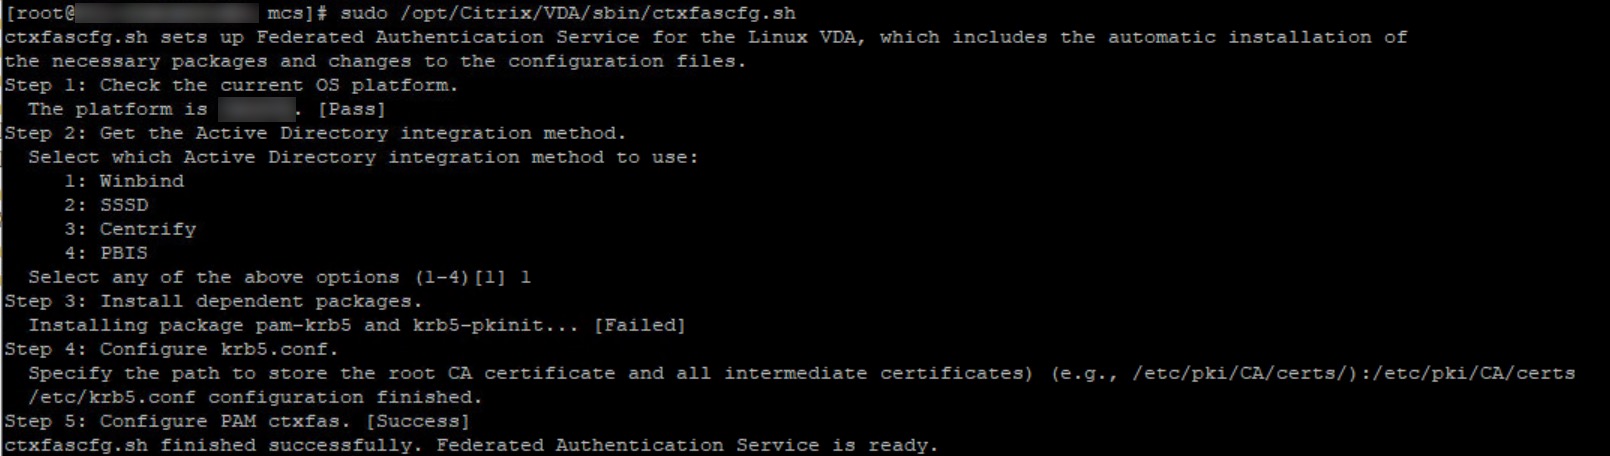
Now we will get back to /etc/krb5.conf, but then again Yeah not really
If you follow Citrix Docs and edit /etc/krb5.conf, with the info needed for your environment, it’ll get wiped as soon as you use it for MCS.
I don’t know why, but it does.
So, we need to edit /var/xdl/mcs/ad_join.sh and edit the function conf_winbind to look like this:
function conf_winbind_krb5()
{
    log "Debug: Enter function conf_winbind_krb5"
    krbFile="/etc/krb5.conf"
    winbind_krbFile="/etc/xdl/mcs/winbind_krb5.conf.tmpl"

    # Customize /etc/krb5.conf
    envsubst < "$winbind_krbFile" > "$krbFile"

    log "Debug: Exit function conf_winbind_krb5"
}
“REALM=$REALM AD_FQDN=$AD_FQDN realm=$realm” has been removed.
If you take a look at the code above. envsubst, in lack of a better word, copies what is written in $winbind_krbFile to $krbFile.
Instead of editing /etc/krb5.conf, we’ll go and edit /etc/xdl/ad_join/winbind_smb.conf.tmpl.
[logging]
default = FILE:/var/log/krb5libs.log
kdc = FILE:/var/log/krb5kdc.log
admin_server = FILE:/var/log/kadmind.log
[libdefaults]
default_ccache_name = FILE:/tmp/krb5cc_%{uid}
dns_lookup_realm = false
ticket_lifetime = 24h
renew_lifetime = 7d
forwardable = true
rdns = false
spake_preauth_groups = edwards25519
default_realm = DOMAIN.LOCAL <--- edit
dns_lookup_kdc = true
[realms]
# EXAMPLE.COM = {
#     kdc = kerberos.example.com
#     admin_server = kerberos.example.com
# }
EDIT and move arrow --->DOMAIN.LOCAL = {
kdc = domaincontrollername01.domain.local <--- edit
auth_to_local = RULE:[1:$1@$0]
pkinit_kdc_hostname = domaincontrollername01.domain.local <--- edit
pkinit_kdc_hostname = domaincontrollername02.domain.local <--- edit
pkinit_anchors = FILE:/etc/pki/CA/certs/root.pem <--- if you followed the article, this is the path for the certificates
pkinit_pool = FILE:/etc/pki/CA/certs/intermediate.pem <--- if you followed the article, this is the path for the certificates
pkinit_eku_checking = kpServerAuth
pkinit_cert_match = ||<EKU>msScLogin,<KU>digitalSignature
}
[domain_realm]
domain.local = DOMAIN.LOCAL <--- edit both sides of "="
.domain.local = DOMAIN.LOCAL <--- edit both sides of "="
It’s extremely important to type all of your domain controllers in pkinit.kdc.hostname
Create a new, pkinit_kdc_hostname, for every domain controller you have in your environment.
If this is not done, you might end up with a login error saying “Invalid Login”
Shutdown the VM. Take a snapshot and create a machine catalog, like you normally would and create X amount of VDA from the snapshot.
I hope this helps you.