REWORK of guide to install Linux VDA, w/ MCS and FAS

Rework of a guide to install Linux VDA, on RHEL, configured with Citrix FAS and MCS
- Citrix support and a BIG thank you
- Trial’n’error
- Components in use
- Tools
- Prerequisites
- Supported Linux distributions for MCS and FAS
- Pre-VDA installation configurations
- VDA Installation and configuration
- A short intro to ctxreg before we continue
- FAS configuration
- MCS Configuration
- A few tips
Citrix support and a BIG thank you
There’s been written many stories and novels about Citrix support and how challenging this experience can be.
But this story is a little different, because of one guy, Vijaykumar P.
He works as an Escalation Engineer within Citrix Support.
He’s the most pro-active, helpful and knowledgeable supporter I’ve dealt with, when talking with Citrix support. If your case get assigned to him, don’t worry, you’re in good hands.
So just a big shout-out and thanks!
Trial’n’error
My last article was pretty much, a trial’n’error installation of Linux VDA. Since then, I’ve tried following it a couple of times, and none of them worked :)
This guide will be a complete rework, both how the installation is done and include troubleshooting.
And to be honest. I wrote the article, one and half year after installation/configuration. So, sorry to those guys, who may have tried followed the guide.
This new post, will be fresh from memory.
Components in use
- RHEL 8.8 Workstation VM on VMWare ESXi 7.0.3
- XenDesktop VDA 2308 Agent
Tools
- PuTTY
- WinSCP
- Browser to access vCenter
Prerequisites
- Internet!.. For the love of god.. internet..
Otherwise you will need to setup a local repo containing every dependency needed for each installation. A.k.a. new VDA version, new repo, new dependencies.Yees, it’s copied from the original Linux VDA guide. ‘Cause I can’t emphasize it enough!
- A working Citrix FAS configuration
- Download Citrix VDA for Linux rpm package
https://www.citrix.com/downloads/citrix-virtual-apps-and-desktops/components/linux-vda-2308.html
Supported Linux distributions for MCS and FAS
As per written, the supported versions are as follows:
MCS supported distributions:
| Distributions Version | Winbind | SSSD | Centrify | PBIS |
|---|---|---|---|---|
| Debian 11.3 | Yes | Yes | No | Yes |
| RHEL 9.2/9.0 | Yes | Yes | No | No |
| RHEL 8.8/8.6 | Yes | Yes | Yes | Yes |
| Rocky Linux 9.2/9.0 | Yes | Yes | No | No |
| Rocky Linux 8.8/8.6 | Yes | Yes | No | No |
| RHEL 7.9, CentOS 7.9 | Yes | Yes | Yes | Yes |
| SUSE 15.4 | Yes | Yes | No | Yes |
| Ubuntu 22.04, Ubuntu 20.04 | Yes | Yes | No | Yes |
Distributions where FAS is supported on MCS created VMs:
| Distributions Version | Winbind | SSSD | Centrify | PBIS |
|---|---|---|---|---|
| RHEL 9.2/9.0 | Yes | No | No | No |
| RHEL 8.x | Yes | No | No | Yes |
| Rocky Linux 9.2/9.0 | Yes | No | No | No |
| Rocky Linux 8.x | Yes | No | No | No |
| RHEL 7, CentOS 7 | Yes | Yes | No | Yes |
| Debian 11.3 | Yes | No | No | No |
| SUSE 15.4 | Yes | No | No | No |
| Ubuntu 22.04, Ubuntu 20.04 | Yes | No | No | No |
To be sure authentication works, the only supported method is “Winbind”. SSSD as an authentication method for Citrix FAS, which seems almost dead, since it’s only available for RHEL/CentOS 7. And RHEL 7 only has extended maintenance and CentOS 7 only has security support.
Other than that, choose whatever distribution that suits you or your organization.
Pre-VDA installation configurations
Connect to the VM using PuTTY and WinSCP
It’s easier to edit files using WinSCP, if aren’t familiar with Linux and nano/vi
Hostname
Edit /etc/hostname so only one name is present
Assign a loopback address to the hostname
Edit /etc/hosts so only the following is present:
127.0.0.1 servername.domain.local servername localhost
Remove any other references to hostname-fqdn and hostname.
The Linux VDA currently does not support NetBIOS name truncation. The host name must not exceed 15 characters. Tip: Use a–z, A–Z, 0–9, and hyphen (-) characters only. Avoid underscores (_), spaces, and other symbols. Do not start a host name with a number and do not end with a hyphen.
Check the hostname
Hostname and Hostname -f
The results should be:
servername and servername.domain.local
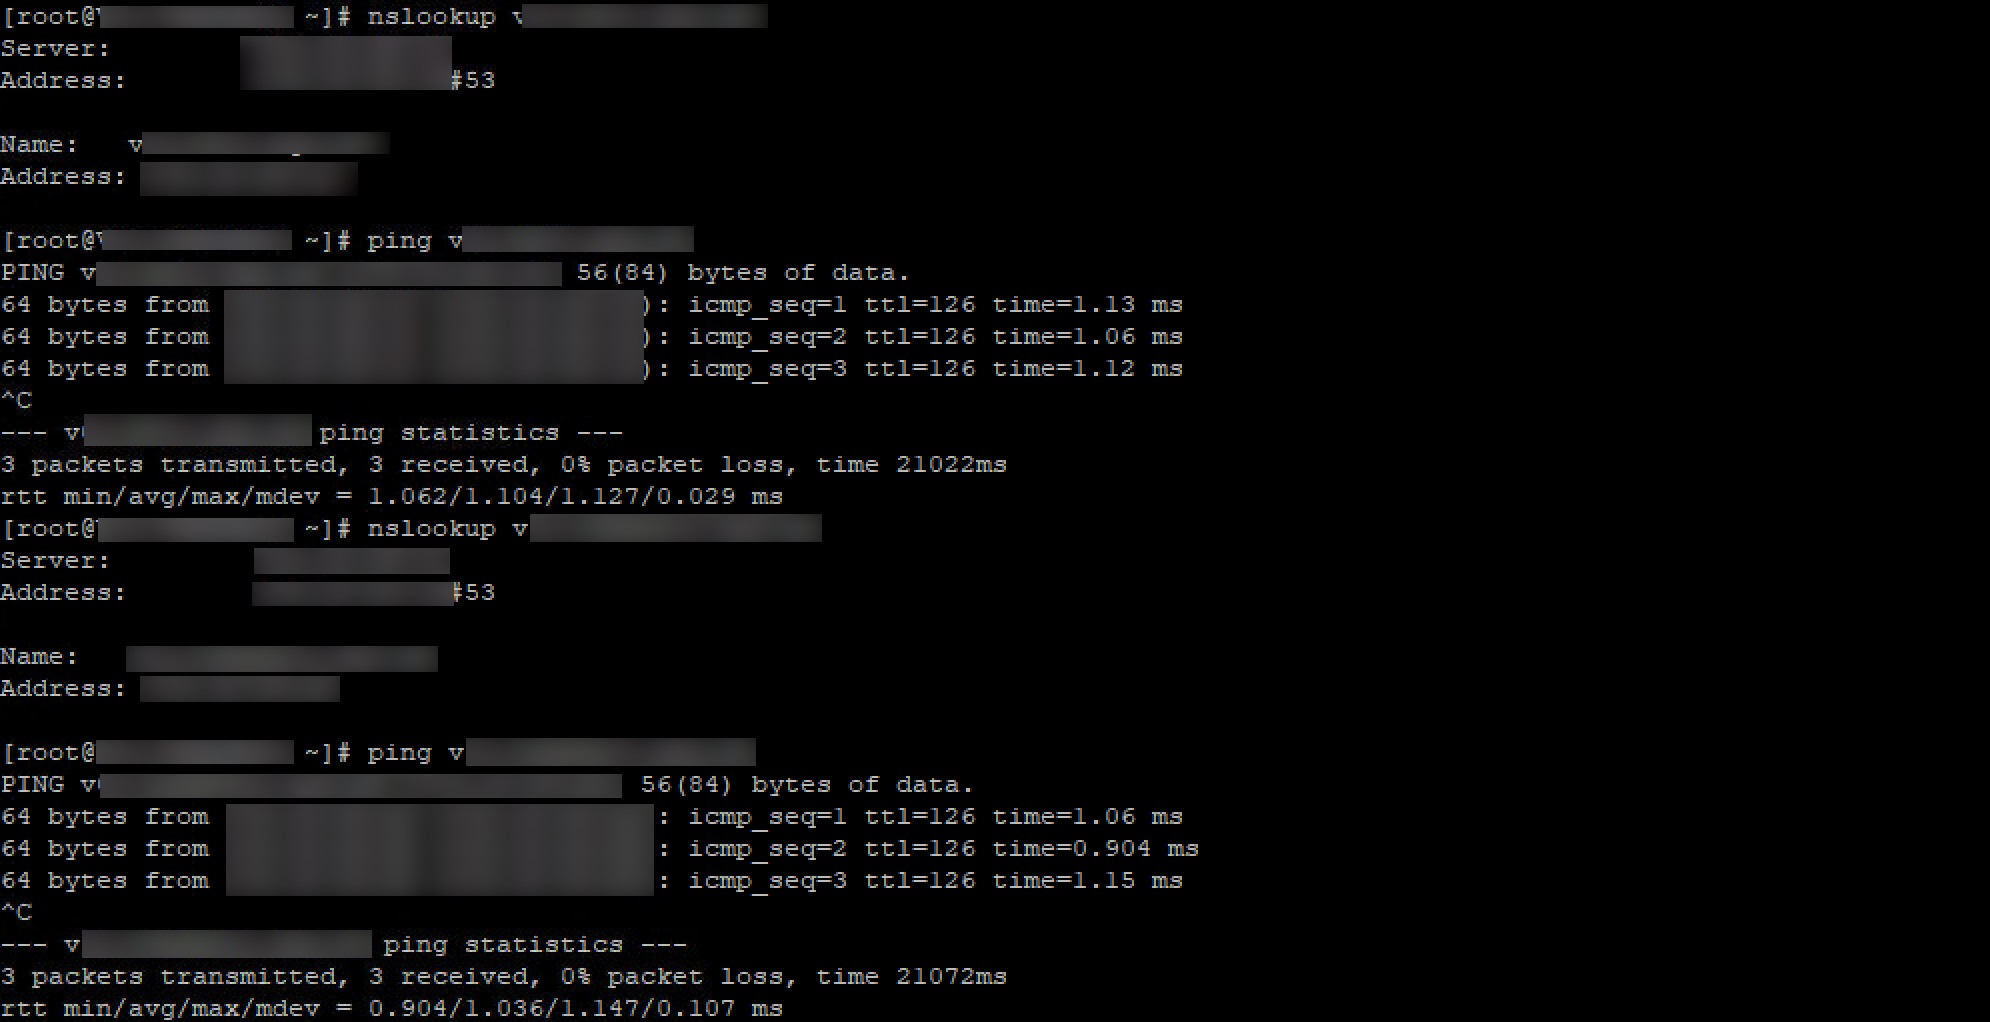
DNS and network reachabilitity
Run the following four commands, to make sure that the VM is able to reach both domain controller and delivery controller
nslookup domain-controller-fqdn
ping domain-controller-fqdn
nslookup delivery-controller-fqdn
ping delivery-controller-fqdn
The results should look like this:
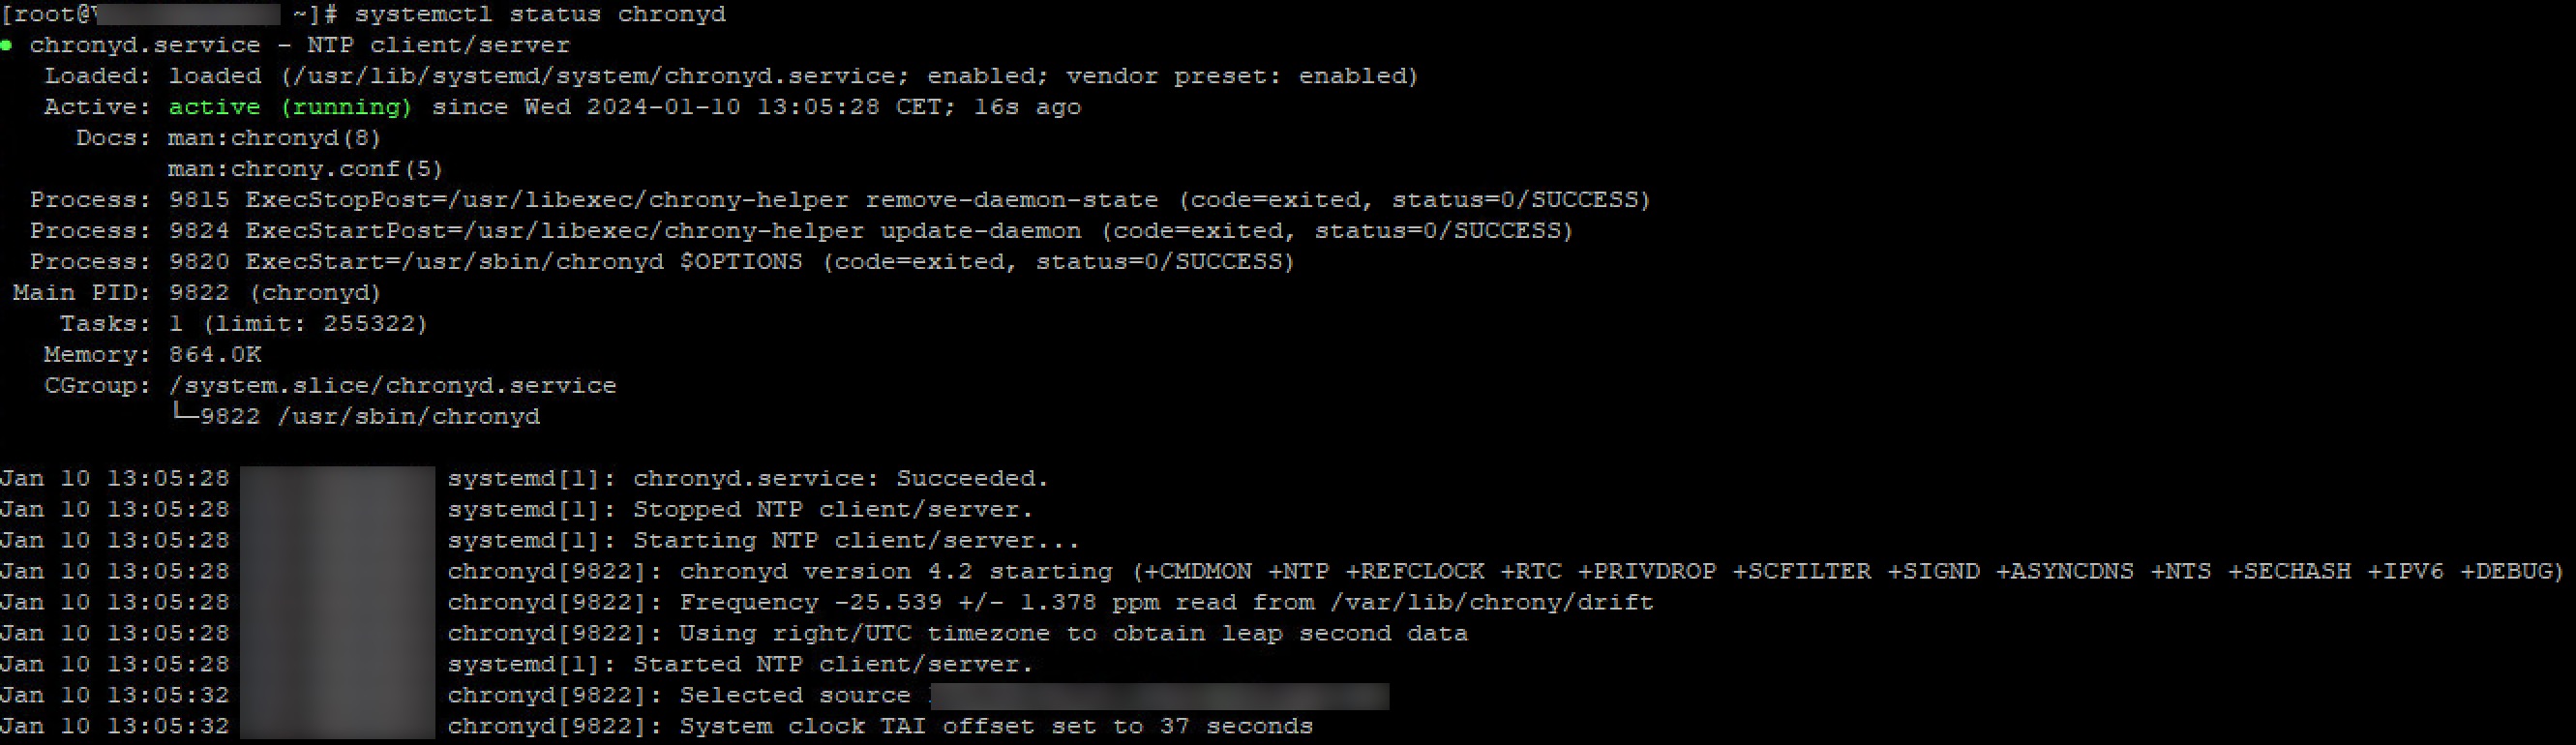
Time synchronization using Chrony
Edit /etc/Chrony.conf using root account. Type in your domain controllers or a NTP server of your choice, with iburst following.
server peer1-fqdn-or-ip-address iburst
server peer2-fqdn-or-ip-address iburst
Restart chrony deamon service
sudo /bin/systemctl restart chronyd
Install and specify a database
Since this is a multi-session environment, the database of choice is PostgreSQL.
Citrix recommends SQLlite for single-session environments
Six commands needs to be executed:
sudo yum -y install postgresql-server
sudo yum -y install postgresql-jdbc
sudo yum -y install libpq
sudo postgresql-setup initdb
sudo systemctl enable postgresql
sudo systemctl start postgresql
The first three installs PostgreSQL. The fourth initiates the database and creates database files under /var/lib/pgsql/data. The last two enables and start PostgreSQL, though enable also sets that the service starts on startup.
Check the version of PostgreSQL by using:
psql --version

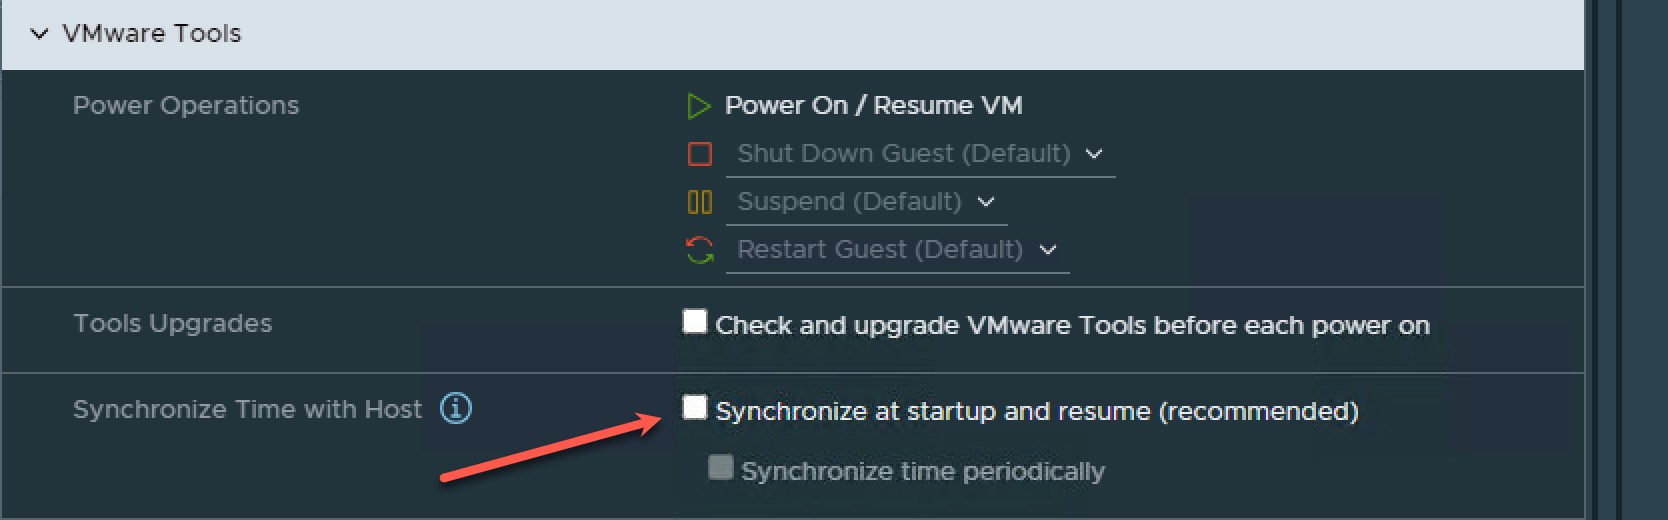
Time synchronization fix on ESXi
When using ESXi, VMware Time Synchronization needs to be disabled for the VMs. Otherwise there’s two clock synchronizations, NTP and hypervisor, which can cause some issues.
Untick “Syncronize at startup and resume (recommended)”
Add VM to domain
This isn’t required since the VDAs will join the domain using MCS, but it’s great to see that the VM is able to join the domain and later test FAS.
Install the required packages:
sudo yum -y install samba-winbind samba-winbind-clients krb5-workstation oddjob-mkhomedir realmd authselect
Enable Winbind service at startup:
sudo /sbin/chkconfig winbind on
The result should look like this:

Configure the machine for Kerberos authentication by using Winbind:
sudo authselect select winbind with-mkhomedir --force
Using WinSCP or nano. Edit /etc/samba/smb.conf and add the following three lines in [GLOBAL] section:
kerberos method = secrets and keytab
winbind refresh tickets = true
winbind offline logon = no
Edit /etc/krb5.conf, using WinSCP or nano, and add entries under the [libdefaults], [realms], and [domain_realm] sections:
REALM and realm is to be edited, so it fits your domainname.
REALM is DOMAIN.LOCAL and realm is domain.local
Under the [libdefaults] section:
default_ccache_name = FILE:/tmp/krb5cc_%{uid}
default_realm = REALM
dns_lookup_kdc = true
Under the [realms] section:
REALM = {
kdc = fqdn-of-domain-controller
}
Under the [domain_realm] section:
realm = REALM
.realm = REALM
Krb5.conf should look something like this:
Join the VM to the domain, using the following command and an account which has privilege to join a computer to the domain:
Edit REALM to your DOMAIN.LOCAL
sudo realm join -U user --client-software=winbind REALM
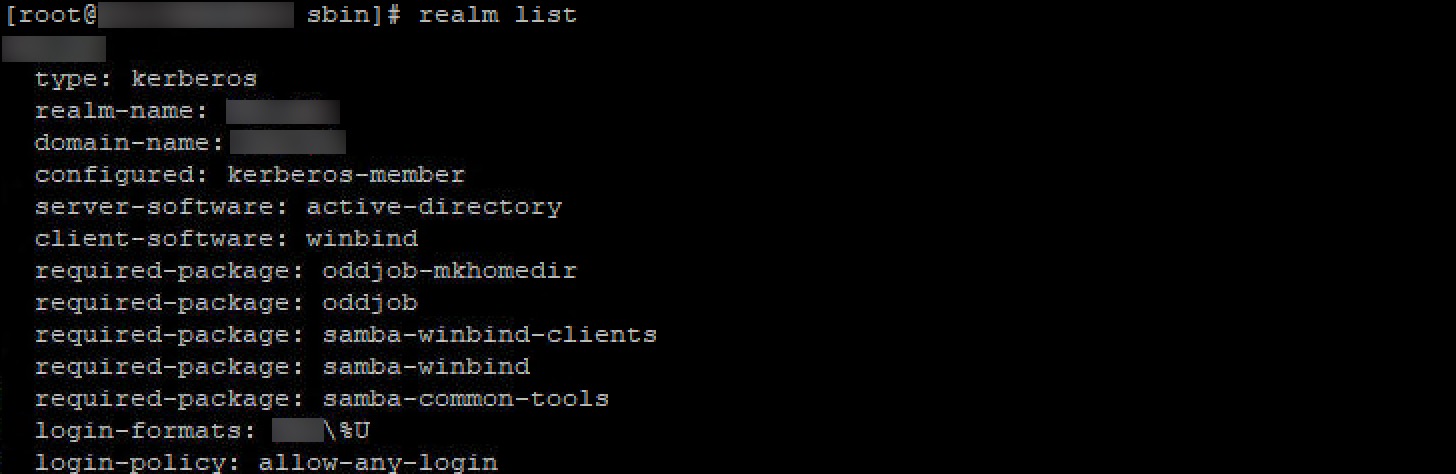
To confirm domain join form the machine:
realm list
Edit /etc/security/pam_winbind.conf, using WinSCP or nano, and add or change the following entries under the [Global] section:
krb5_auth = yes
krb5_ccache_type = FILE
mkhomedir = yes
These settings require a restart of Winbind deamon:
systemctl restart winbind
systemctl status winbind
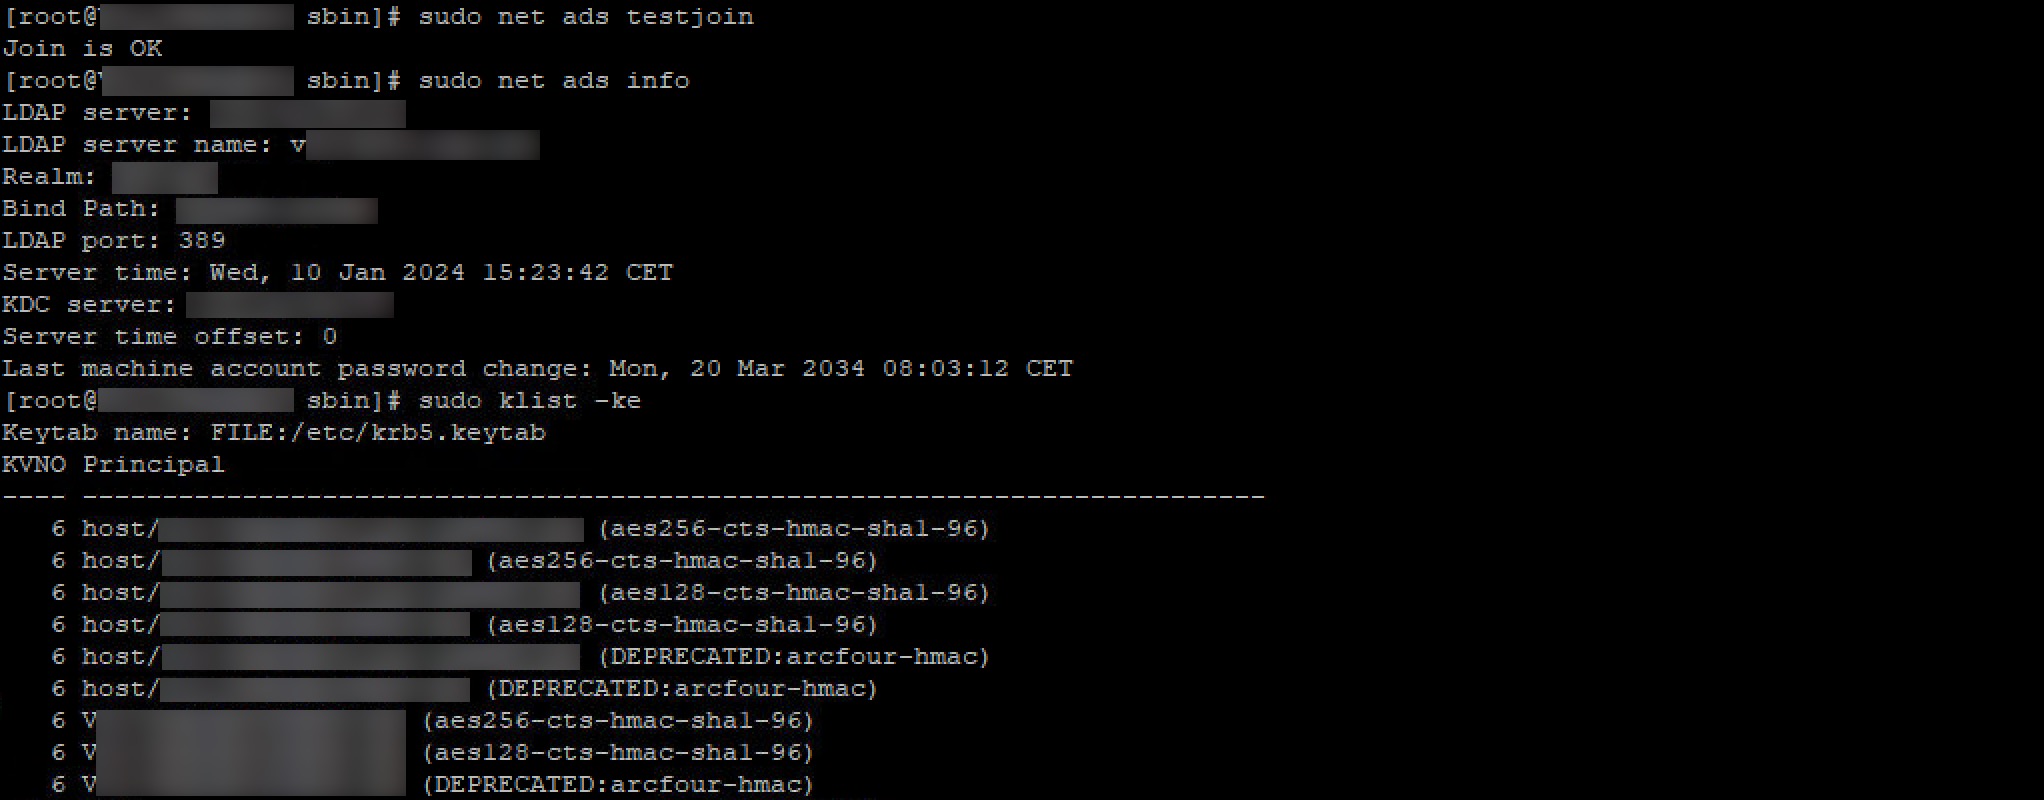
Verify domain and kerberos configuration:
sudo net ads testjoin
sudo net ads info
sudo klist -ke
.NET Runtime 6.0 installation
.NET Runtime needs to be install, before anything regarding Citrix is installed
sudo yum install aspnetcore-runtime-6.0
which dotnet
When install .NET Runtime with the above command, the default dotnet path is:
/usr/bin
Take a note of this, because this is going to be used later in the VDA configuration
Install EPEL repos
Like .NET Runtime, EPEL repos are required to be installed before the VDA package
subscription-manager repos --enable codeready-builder-for-rhel-8-$(arch)-rpms
dnf install https://dl.fedoraproject.org/pub/epel/epel-release-latest-8.noarch.rpm
VDA Installation and configuration
Download Linux VDA for RHEL 8.8 and for those guys, who is into security and verifications, go ahead and download the GPG key and verify the integrity of the package.
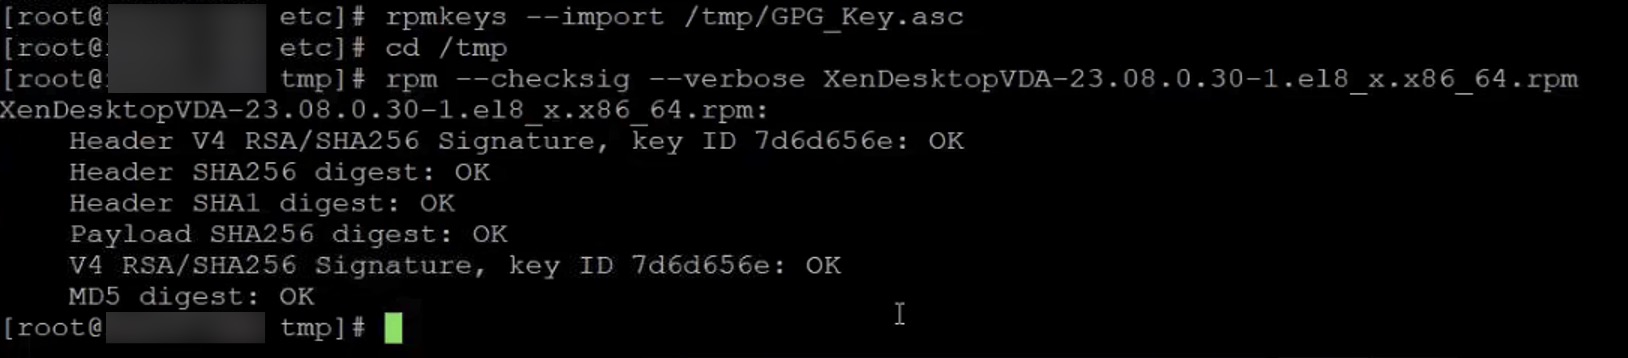
Copy both the .rpm and .asc files to /tmp/ using WinSCP and execute the following:
rpmkeys --import /tmp/GPG_Key.asc
cd /tmp
rpm --checksig --verbose XenDesktopVDA-23.08.0.30-1.el8_x.x86_64.rpm
Install VDA package
sudo yum install -y XenDesktopVDA-23.08.0.30-1.el8_x.x86_64.rpm
The install checks if all dependencies are present in the VM. In my case, several of the dependencies were missing. These has to be installed manually, before retrying to install the VDA package.
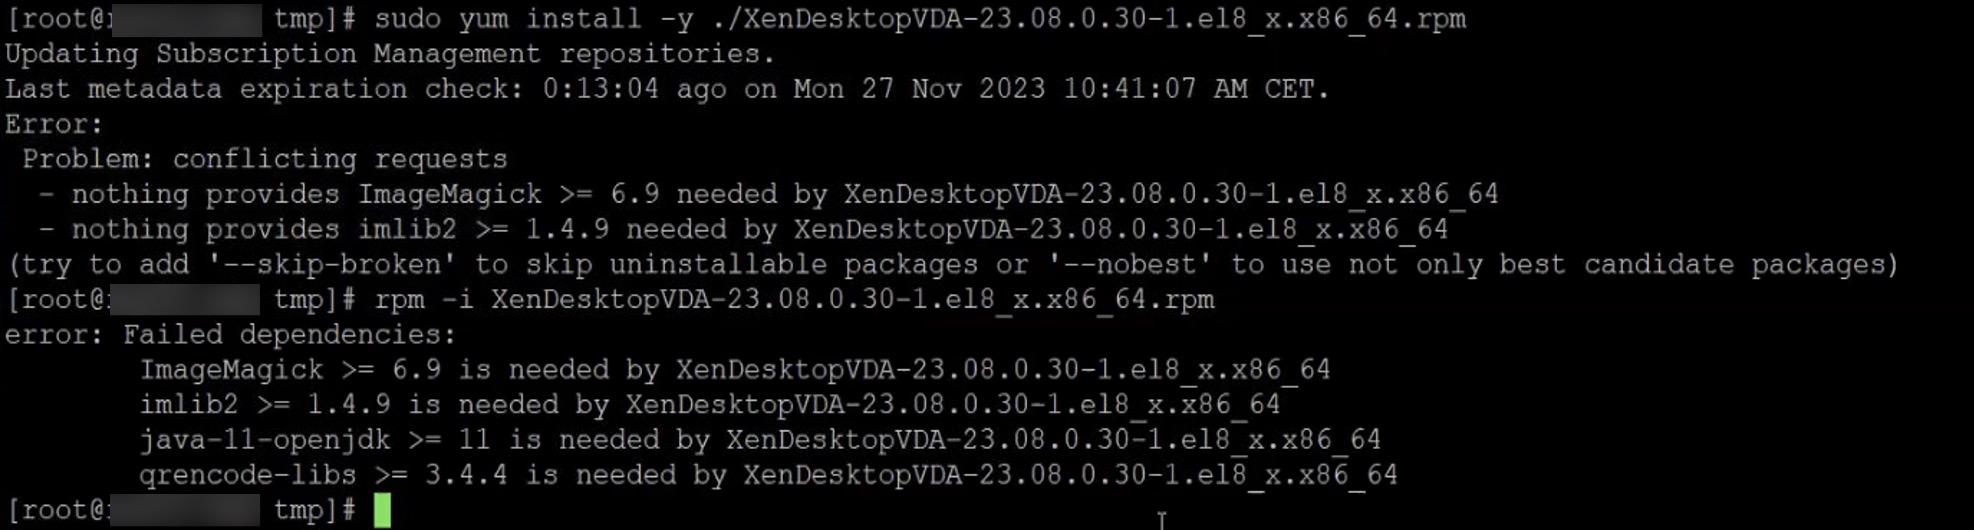
In my case. The missing dependencies was:
- ImageMagick
- imlib2
- java-11-openjdk
- qrencode-libs
yum -y install ImageMagick
yum -y install imlib2
yum -y install qrencode-libs
yum -y install java-11-openjdk
After all the dependencies have been installed the VDA package is installed correctly.
ctxinstall.sh and ctxsetup.sh
Complete the installation with the following commands:
cd /opt/Citrix/VDA/sbin/
./ctxinstall.sh
The installation can be monitored from a new SSH by executing:
tail -f /var/log/xdl/ctxinstall.log
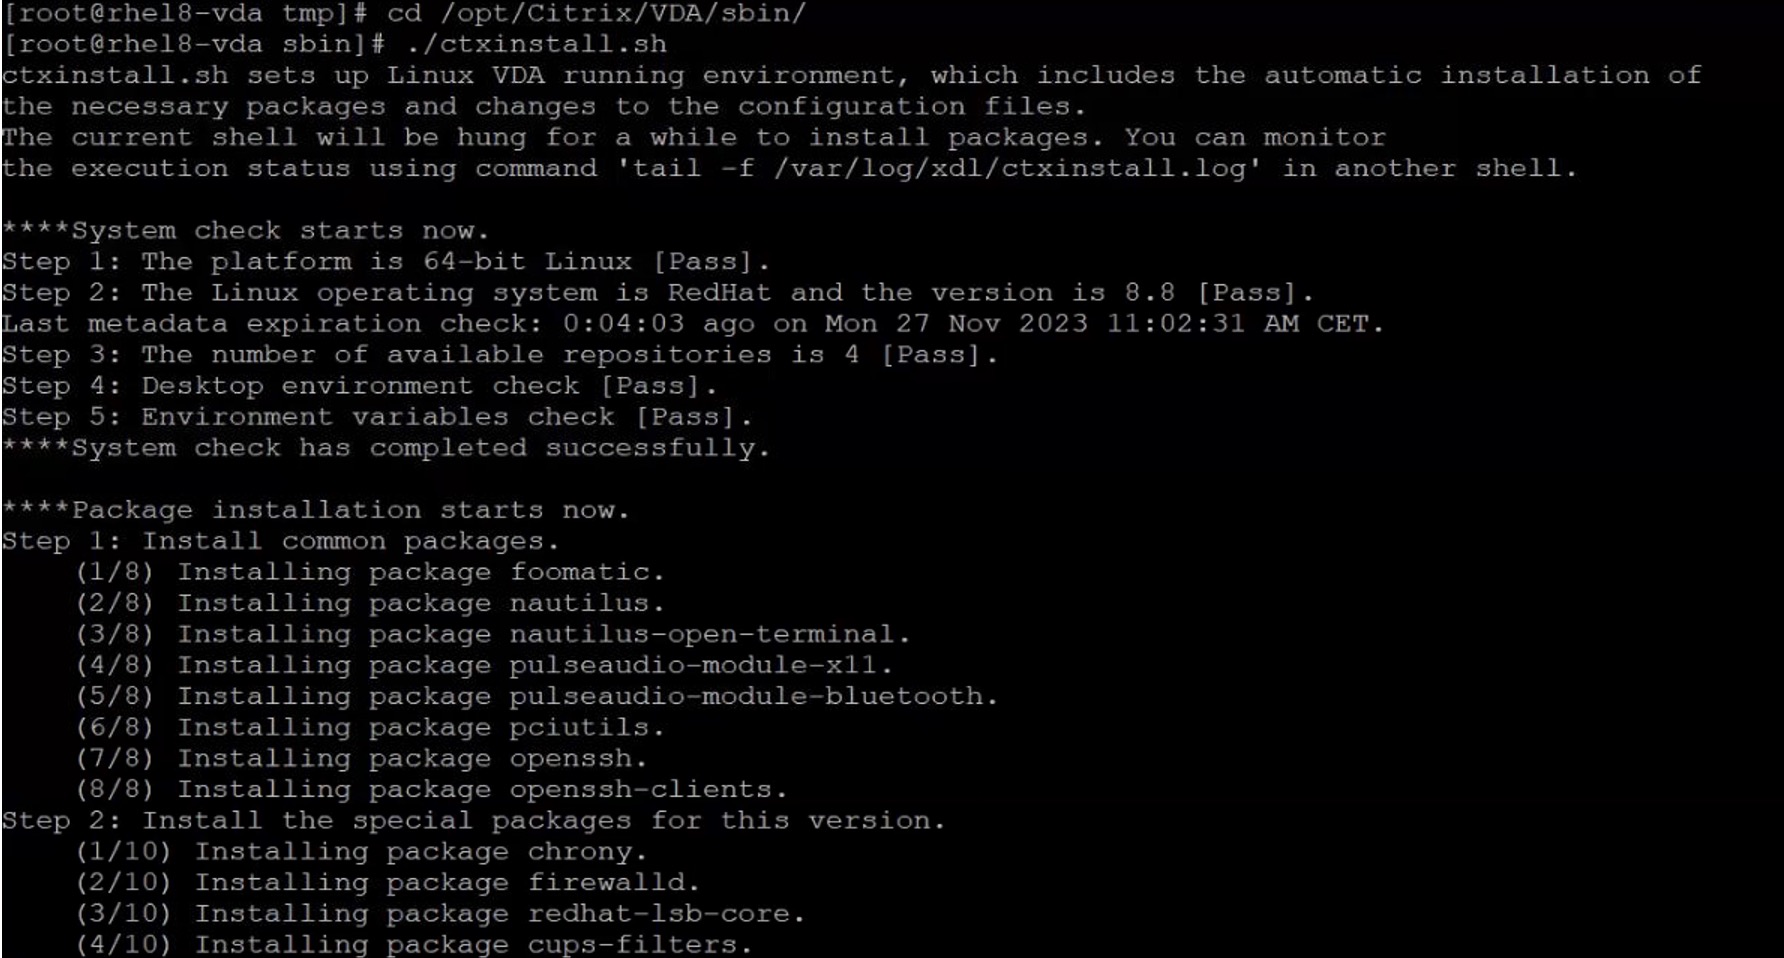
Important: After the installation, if it displays “Step 1: Get user input”, as shown below, do not proceed with adding the details here. Cancel it by pressing Ctrl+C.

Run ctxsetup.sh to configure the VDA configuration:
cd /opt/Citrix/VDA/sbin/
./ctxsetup.sh
This is a prompted configuration, where the installer asks for your input, such as: CTX_XDL_DOTNET_RUNTIME_PATH=path-to-install-dotnet-runtime
Applying the note from earlier, the answer here would be /usr/bin
CTX_XDL_DDC_LIST=list-ddc-fqdns
For this input, you should type at least one FQDN of a DDC. If you have multiple, they need to be space-separated.
Instead of cluttering this post, with all the configuration questions, you can find more information on this page.
After the configuration has finished, it’s time for good old XDPing.
cd /opt/Citrix/VDA/bin
./xdping
This tool provides a wealth of information about all the services in use, including the most important errors related to these services. Some errors are self-explanatory; for example, Kerberos weak crypto disabled was a test and, of course, needs to be disabled. 
XDPing ultimately provides a summary with errors and warnings, with the majority of errors requiring correction. 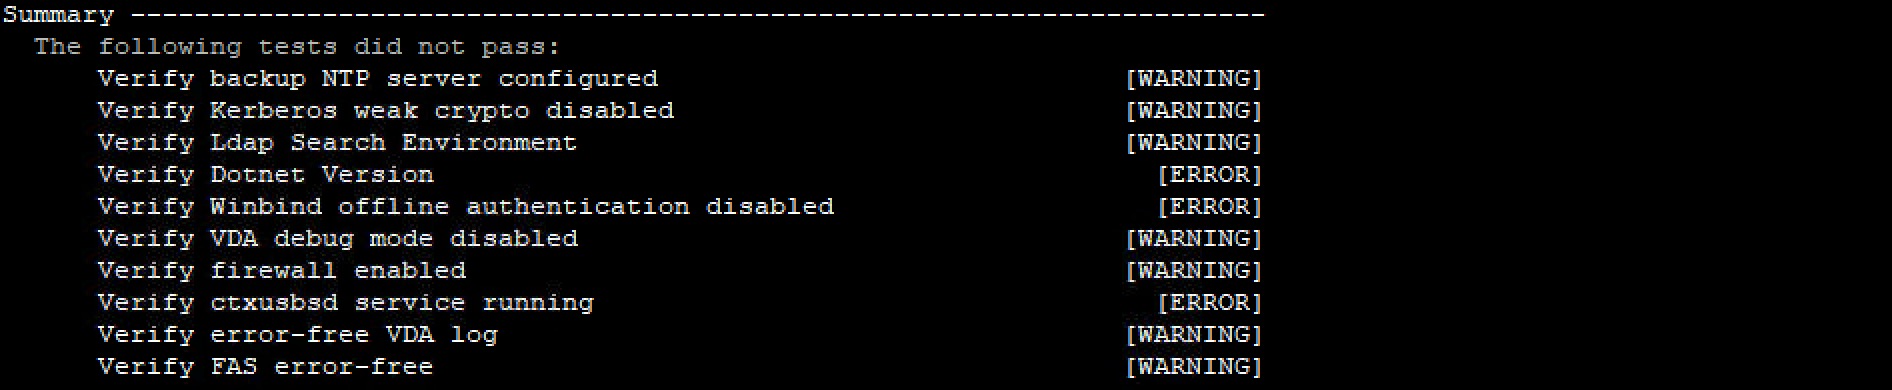
Make sure that the VDA service is running
systemctl status ctxvda
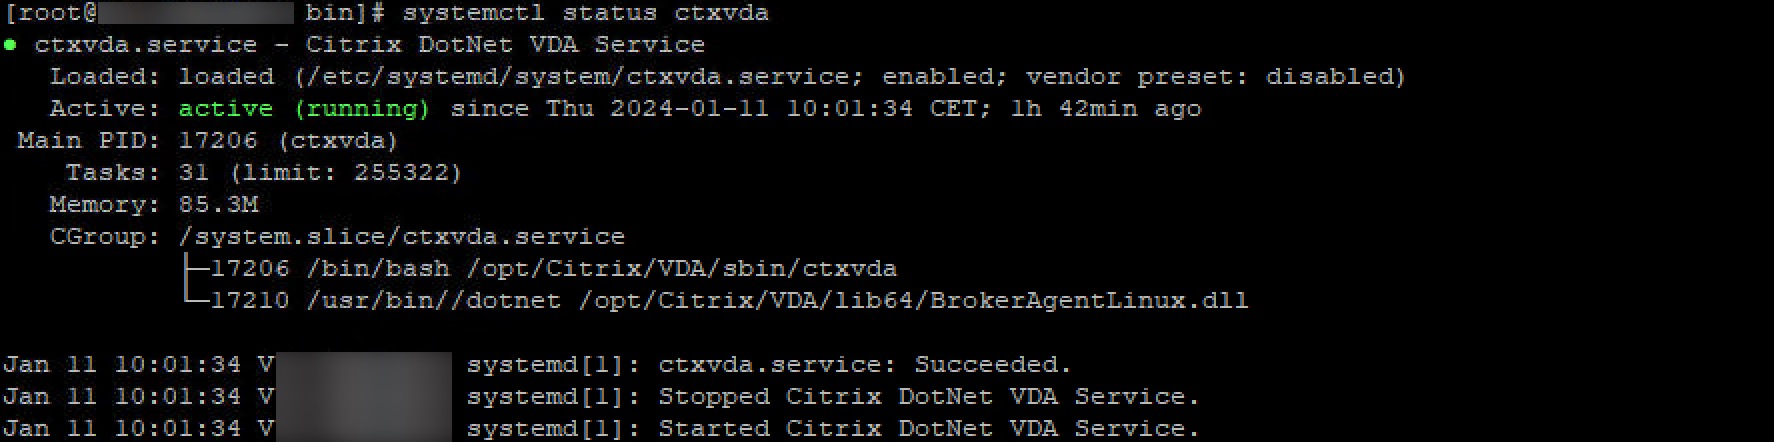
That concludes the installation and configuration of the VDA.
At this point, it’s possible to create a machine catalog and delivery group, to check if the VDA registers correctly.
Publish a desktop and connect to the VDA; it will prompt for username and password, since Citrix FAS isn’t configured yet.
It would be a good idea to take a snapshot of the VM at this point.
A short intro to ctxreg before we continue
So my guess is; Citrix created the Linux VDA out of demand, not because they really saw a market for it. Someone might have waved a blank cheque and said “go fix”.
Because, what they did was; create a Windows registry hive inside Linux.
From my limited experience with Linux, I don’t think this is what Linus Torvalds had in mind, when he created the Linux kernel.
Anyways. ctxreg is the container of these registry settings. This is where all Citrix related information is written.
E.g. VDA configuration from earlier: Delivery Controllers, Citrix FAS, File transfers.
create -k "HKLM\Software\Citrix\VirtualDesktopAgent" -t "REG_SZ" -v "ListOfDDCs" -d "FQDN FQDN" --force
create -k "HKLM\Software\Citrix\VirtualDesktopAgent\FasLogon" --force
create -k "HKLM\Software\Citrix\VirtualDesktopAgent\FasLogon" -t "REG_DWORD" -v "FasConfigured" -d "0x00000001" --force
create -k "HKLM\Software\Policies\Citrix\8\User\IO" --force
create -k "HKLM\Software\Policies\Citrix\8\User\IO" -t "REG_DWORD" -v "AllowFileTransfer" -d "0x00000000" --force
create -k "HKLM\Software\Policies\Citrix\8\User\IO" -t "REG_DWORD" -v "AllowPNPRedirection" -d "0x00000000" --force
These settings can be manipulated using ctxreg. Parameter --help shows all parameters available.
I’m unsure if settings is overridden, if using Citrix Policies. My first guess would be “Yes”.
cd /opt/Citrix/VDA/bin/
./ctxreg --help
FAS configuration
Download CentOS pam_krb5 module from vault.centos and copy .rpm to /tmp/.
Build and install the module with the following commands:
Don’t mind CentOS. It’s the correct pam module.
cd /tmp
yum install make gcc krb5-devel pam-devel autoconf libtool
rpm2cpio pam_krb5-2.4.8-6.el7.src.rpm | cpio -div
tar xvzf pam_krb5-2.4.8.tar.gz
cd pam_krb5-2.4.8
./configure --prefix=/usr
make
make install
Verify that pam_krb5.so exists under /usr/lib64/security/
ls -l /usr/lib64/security | grep pam_krb5

I added the Citrix FAS FQDNs to the VDA configuration. This can be verified by typing:
cd /opt/Citrix/VDA/bin/
./ctxreg dump | grep -i usercreden

And if you fancy it; a complete dump of ctxreg is possible:
cd /opt/Citrix/VDA/bin/
./ctxreg dump
That’ll give some information as to what can be set, updated or removed, using the command below.
Citrix FAS FQDNs can be added or updated using this command:
cd /opt/Citrix/VDA/bin/
./ctxreg create -k "HKLM\Software\Citrix\VirtualDesktopAgent\Authentication\UserCredentialService" -t "REG_SZ" -v "Addresses" -d "<Your-FAS-Server-List>" --force
The FQDNs need to be semi;colon-separated
Restart two Citrix services:
systemctl restart ctxjproxy
systemctl restart ctxvda
Import root and intermediate certificates
Export the root and intermediate certificates in PEM format. If multiple intermediate CAs are available, export from all of them.
Copy the certificates to either /tmp/ and use cp or directly to /etc/pki/CA/certs. If /etc/pki/CA/certs isn’t available. Create the folder structure and copy the certificates.
sudo cp root.pem /etc/pki/CA/certs/
sudo cp intermediate.pem or intermediates.pem /etc/pki/CA/certs/
Configure Citrix FAS
cd /opt/Citrix/VDA/sbin/
./ctxfascfg.sh
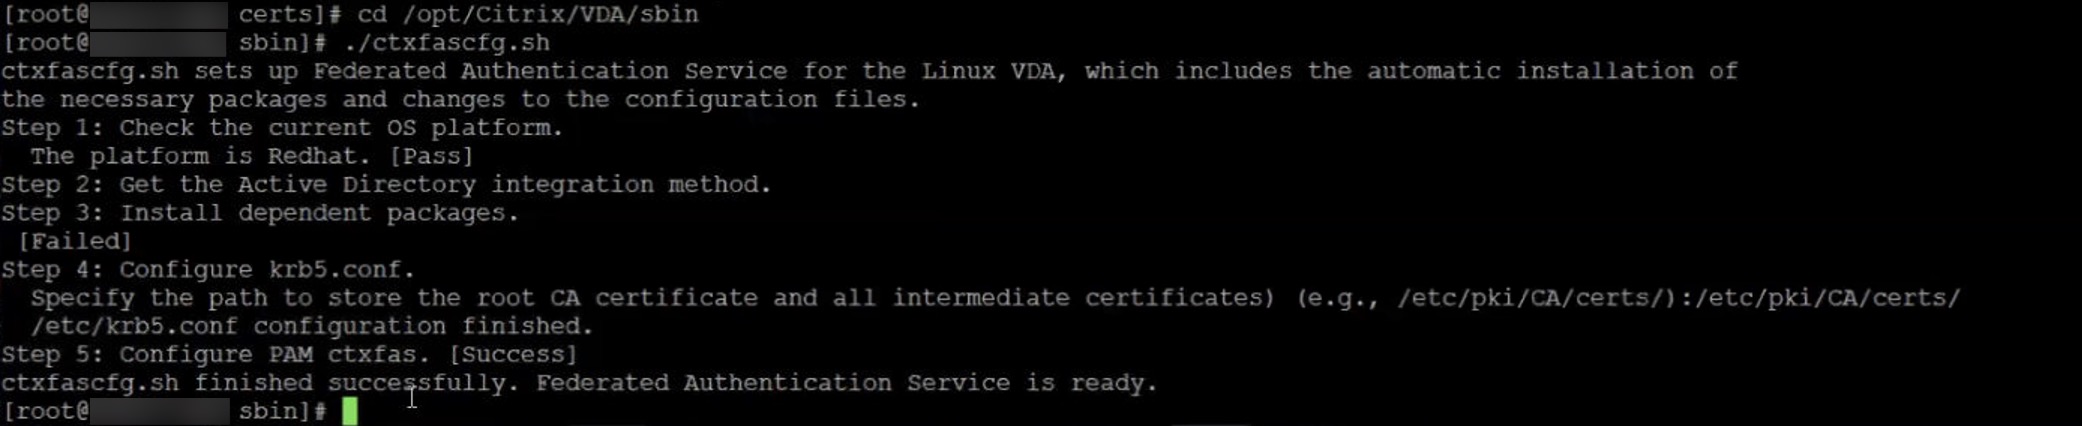
Don’t mind Step 3. The picture is from a rerun of ctxfascfg.sh
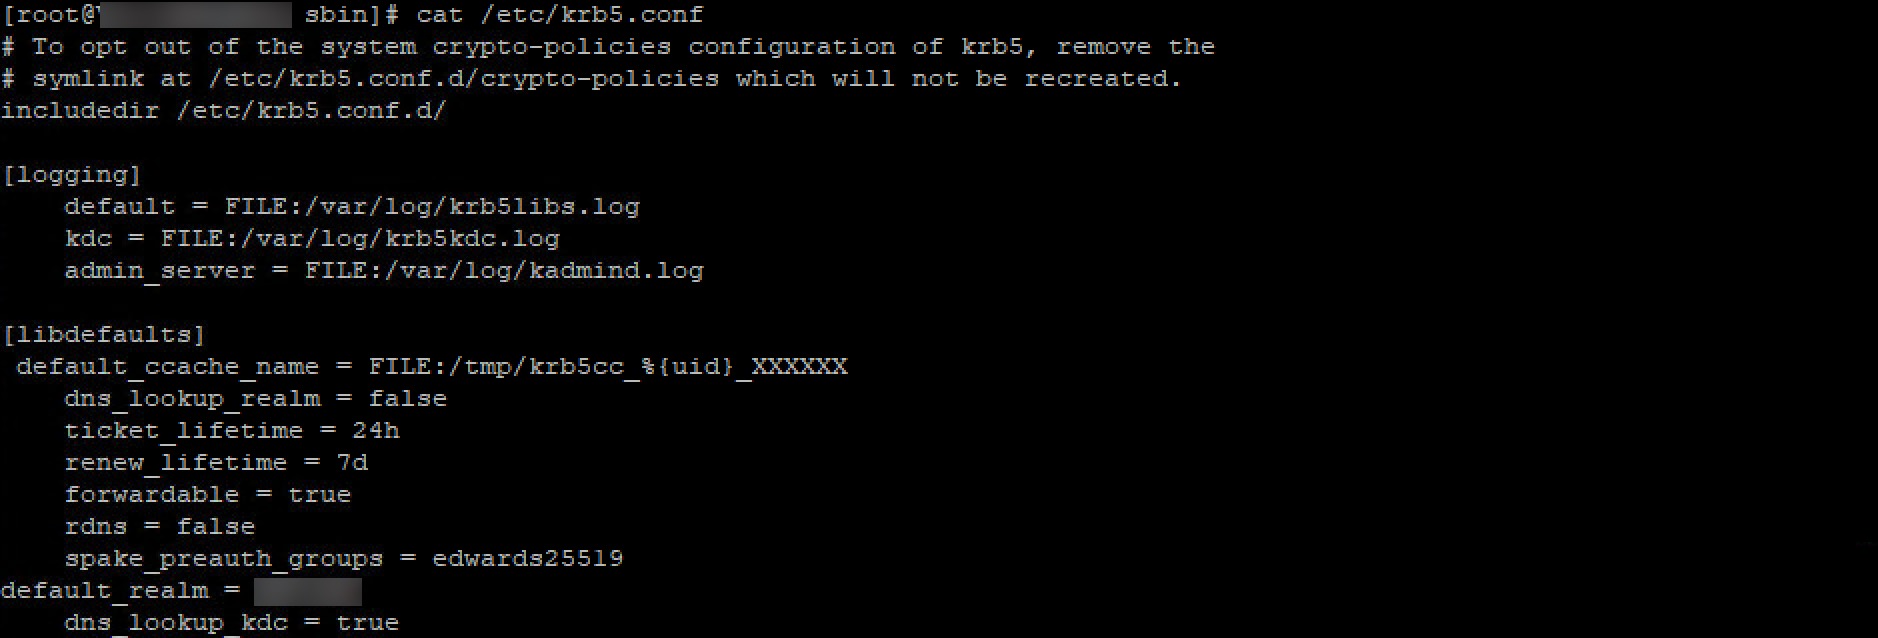
Once completed, check /etc/krb5.conf and add all KDCs(Key Distribution Center). Below is krb5.conf file from my setup:
# To opt out of the system crypto-policies configuration of krb5, remove the
# symlink at /etc/krb5.conf.d/crypto-policies which will not be recreated.
includedir /etc/krb5.conf.d/

[logging]
    default = FILE:/var/log/krb5libs.log
    kdc = FILE:/var/log/krb5kdc.log
    admin_server = FILE:/var/log/kadmind.log

[libdefaults]
 default_ccache_name = FILE:/tmp/krb5cc_%{uid}_XXXXXX
    dns_lookup_realm = false
    ticket_lifetime = 24h
    renew_lifetime = 7d
    forwardable = true
    rdns = false
    spake_preauth_groups = edwards25519
    default_realm = DOMAIN.LOCAL
    dns_lookup_kdc = true
    udp_preference_limit = 0

[realms]
 DOMAIN.LOCAL = {
     kdc = fqdn.domain.controller
     kdc = fqdn.domain.controller
     auth_to_local = RULE:[1:$1@$0]
     pkinit_kdc_hostname = fqdn.domain.controller
     pkinit_kdc_hostname = fqdn.domain.controller
     pkinit_anchors = DIR:/etc/pki/CA/certs/
     pkinit_eku_checking = kpServerAuth
     pkinit_cert_match = ||<EKU>msScLogin,<KU>digitalSignature
     admin_server = fqdn.domain.controller
  }

[domain_realm]
 domain.local = DOMAIN.LOCAL
 .domain.local = DOMAIN.LOCAL
Restart VDA service and connect to the publish desktop, when the VDA har registered:
systemctl restart ctxvda
MCS Configuration
Citrix created a tool called Easyinstall which I’m going to use, to set up the MCS configuration
cd /opt/Citrix/VDA/bin
./easyinstall
This opens a GUI where information, such as Delivery Controllers, DNS server, and so on, needs to be typed.
One of the most important settings is “Use_AD_Configuration_Files_Of_Current_VDA”. The default is ‘N,’ and in this case, it needs to be set to ‘Y’ since I’ve already configured all AD settings in the VDA configuration.

When all relevant information have been typed, press Deploy and Easyinstall will do it’s thing and hopefully end up saying “Finished preparing a master image”.

DNS servers needs to corrected in mcs.conf
After using Easyinstall for the MCS configuration, I noticed that the LDAP list was not getting saved correctly in the mcs.conf file. All the servers were put in one line instead of separate lines.
It didn’t cause initial issues, but I’m quiet sure that it could later on.
#########################DNS Configuration#####################################
# Provide DNS information
# You can provide 4 DNS servers at most.
# Leave empty if you do not have 4 servers. You may also leave all of them empty
# and configure dns manually.
# Format:
# dns1="xx.xx.xx.xx"
# dns2="xx.xx.xx.xx"
# dns3=
# dns4=
dns1='IP IP IP IP'
dns2=''
dns3=''
dns4=''
This was corrected to:
#########################DNS Configuration#####################################
# Provide DNS information
# You can provide 4 DNS servers at most.
# Leave empty if you do not have 4 servers. You may also leave all of them empty
# and configure dns manually.
# Format:
# dns1="xx.xx.xx.xx"
# dns2="xx.xx.xx.xx"
# dns3=
# dns4=
dns1='IP'
dns2='IP'
dns3='IP'
dns4='IP'
Shutdown the VDA. Create a snapshot. Create a new machine catalog, as you would any other, with MCS. Assign VDAs to a delivery group or create a new one.
This concludes the installation of VDA, configuration of Citrix FAS and MCS.
Let me know what you think or has comments.
A few tips
This is an unfinished list, I’ll continue to add to.
Lock Linux version
Like any other OS, RHEL needs to be updated for security and hotfix’(probably not the correct term in Linux country).
In Linux you can lock the OS to a specific version, both major and minor.
This is important, since Citrix only supports specific versions. E.g. for RHEL 8, it’s 8.6 and 8.8 (as per written). If yum update is used and OS version is not locked, then it automatically updates to the latest minor version.
The commands are different from each distribution. For RHEL, it’s the following commands.
subscription-manager release --list
subscription-manager release --set=8.8
yum clean all
yum updateinfo
yum update
The first shows a list releases
The seconds sets both major and minor release
The third removes all prio updates
The fourth returns which updates are available for the OS
The fifth updates the OS, with the available updates